How to make your pendrive bootable

Now a days most of the people use laptop because of easy to operate. For easy of carrying there are many small version of laptop which are without any CD-rom. And also some desktop computer which is without CD-rom or CD-rom is out of order. For those user it is quite unable to install windows normally. If they need to install windows they have to buy an external CD-rom or need to go to servicing center which is expensive. It is also difficult and some times it takes long period and so on. But if you have any removable drive like pendrive you can install windows by using it. It works both laptop and desktop computer. It takes only an hour to create bootable drive. For those user it is a important tutorial. Now i will show you that How to make your pendrive bootable. Just  follow the instruction.

Solution:-
Files need to be downloaded:-
Password:-  jabadbd24

Necessary files:-
1. 4GB pendrive
2. Windows XP CD
3. Windows 7 / VISTA CD

Process:-
1. Download all files in your computer
2. Then Extract them
3. Now attach pendrive with your computer
note: Format the pendrive in FAT32
4. Open WinSetupFromUSB-Modified folder
5. Select right button on WinSetupFromUSB.exe and click Run as administrator
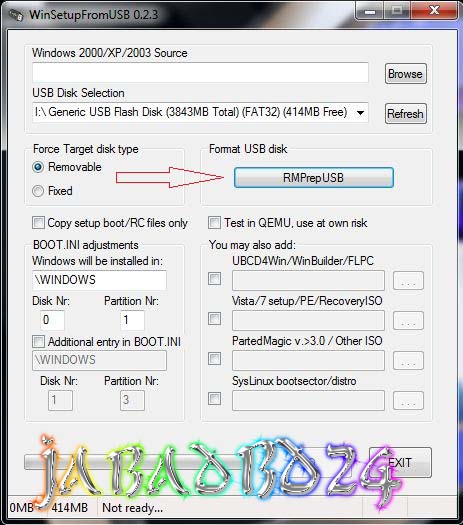
6. Now look at USB Disk Selection, there showing your pendrive if not then click on Refresh
7. Now click on RMPrepUSB from Format USB Disk
8. A new window will be open
9. Now click on XP/BartPE bootable[NTLDR] from 3 Boot options
10. Then click on NTFS & Boot as HDD from 4 FileSystem and OverRides
11. Now look at Drive1 box, there showing your pendrive if not then click on Refresh
12. Click on 6 Prepare Drive option
13. If you find any notification click OK
14. Now wait for sometimes for Operation Completed
15. After Completed close the window PREPUSB
16. Now enter your Windows XP CD in CD Rom
17. Click Browse from Windows 2000/XP/2003 Source and show your cd rom or XP source
18. After that click on GO
19. A notification will come when complete, click OK
20. Then enter your Windows  7 / VISTA  in CD Rom
21. Click on Vista/7 setup/PE/RecoveryISO box from you may also add
22. Click Browse from  Vista/7 setup/PE/RecoveryISO  and show your cd rom or  7 / VISTA  source
23. After that click on GO
24. Then wait again
25. A notification will come when complete, click Done
26. Now open bootfiles folder from downloaded files
27. Copy all files from bootfiles
28. Paste it into pendrive directly
29. If its show there is already a file with this name, click on replace
30. Now you can use this pendrive as bootable drive
note: when you install windows XP you will find 2 option , you should select 1st option in first time after restart select the 2nd option
31. Now use and enjoy

Finally, Problem solved!
Now you can make your pendrive bootable!
Congratulations! 
If there any problem, don't hesitate to contact me

How to make your windows genuine (Windows XP only)

Most of the people in our country use Windows XP. They use it because of it's easier features. Windows XP is more easy to operate. But there has also some limitation. All those windows are not genuine. That is why we can not install all software specially which is from Microsoft and which needs genuine permission. For an example If you want to use Microsoft security essential antivirus in your windows XP you have to make your windows genuine. Other ways you have to buy a genuine windows which is approximately more than 100$. So a genuine permission is much important for user. But here is the tips to get a free genuine windows XP. I personally used it and it is very easy. Now i will show you that how to make your windows genuine. Follow the instruction.

Solution:-
Files need to be downloaded:-
Password:-  jabadbd24

Process:-
1. Download files in your computer and put them in a folder
2. Now run WGA-Fix
3. Then run  MGADiag
4. In MGADiag window Click Continue
5. It will show validation status: Invalid
note: It means your windows is not genuine
6. Then run Windows XP Pro Serial  Key Changer
7. Press “Enter” from keyboard a new window will open named activate window
8. From this window choose the second Radio button & Click Next
9. Then click on change Product Key
10. Run Windows XP Keygen and Select Window XP Pro. VLK frm the drop down box
11. After that click ongenerate key
note: By clicking ongenerate key you will get a serial key
12. Copy the key generated paste it in the new key region in activate windows then click update
13. Then close the window
14. Now install the plugin WGAPluginInstall
15. Now again run MGADiag
16. It will show validation status: Genuine
17. Then unzip and run legitcheck.exe and install the pop up
note: After opening legitcheck.exe a new pop up will come install this pop up
18. Now your window is genuine. use and enjoy

Finally, Problem solved!
Now you can make your windows genuine!
Congratulations! 
If there any problem, don't hesitate to contact me

Add picture and information in your system properties (Checked in windows XP)

This is not any important things. It is a tips for customizing system properties. In this tune i am going to discuss how to add your own picture and some basic information (name, address, phone no. etc) in your system properties. You can change this any time if you want. You can also remove it permanently when you want. It is a process of making different to other. Now i will show you that how to add your own picture and information in your system properties. Ok lets follow the instruction. 

Solution:-
Files need to be downloaded:-
Password:-  jabadbd24

Process:-
1. Download all files
note: extract the zip file to get oeminfo.ini
2. Copy the oeminfo.ini and oeminfo.bmp
3. Now go to your SystemRoot  (C:/Windows/system32 )
4. Then paste them in system32
note: This is my informations and my photo. To change it follow the next steps
5. Click right button on oeminfo.ini
6. Select edit
7. Then change Manufacturer, Line2, Line3
8. After changing informations save it
9. Now open your photo which one you want to add in your system properties
10. Save it in bmp format
note: You can use photoshop for make bmp image
11. Now rename it oemlogo.bmp
12. Then select both files and follow the step #2 #3 and #4
13. Now change and enjoy

Finally, Problem solved!
Now you can add your own picture and information in your system properties!
Congratulations! 
If there any problem, don't hesitate to contact me 

Read Bangla in Opera mini and Opera mobile (Checked in all phone)

Opera is one of the popular web browser for mobile and computer. It has two different version for mobile device Opera mini and opera mobile. Opera mobile provides desktop view in mobile device. The main feature of opera is super faster speed. It is my favorite web browser. I always use both opera mini and opera mobile. This browser is too much fast, easy to use, nice interface, able to save data and page etc. It's default language is English  So that we can't watch Bangla normally in Opera web browser. But don't worry there is also an option to view bangla font in opera. If you want to see bangla font in opera browser you have to use this tricks. Now I will show you how to read Bangla in Opera mini and opera mobile. Just follow my instruction.

Solution:-
Files need to be downloaded:-
Password:-  jabadbd24

Process:- 1 (For Opera mini)
1. Download all files
2. Install Opera Mini in your phone
3. Go to address bar
4. Write "about:config" in address and click go
 
5. Then go to the end of the page
6. At the endou will see "Use bitmap fonts for complex scripts"
7. Enable it by selecting Yes
8. Then save it
8. Now go to any bangla site you can see bangla font

Process:- 2 (For Opera mobile)
1. Install Opera mobile in your phone
2. Then install Xplore in your phone
3. Open Xplore and go to (E/System/Apps/OperaMobile/fonts)
4. You will found 6 fonts
5. Now write this 6 fonts name in a page
6. Then delete all fonts
7. Then Download Bangla font (SolaimanLipi)
8. Make 6 copy of Bangla font (SolaimanLipi)
9. Now rename this 6 fonts as like previous fonts which you wrote in a page
10. Mark this 6 fonts and Copy
11. Then paste into (E/System/Apps/OperaMobile/fonts)
12. Now read bangla and enjoy

Finally, Problem solved!
Now you can read Bangla in Opera mini and Opera mobile!
Congratulations! 
If there any problem, don't hesitate to contact me

How to hack your Nokia phone (Checked in Nokia E63)

Every nokia phone has a strong security. So we could not use or install those applications or softwares which are not certified or not trusted. That is why users have to face this kind of problem when they try to install them. Many times we see certificate error, certificate expired, not installed etc. I saw that many people used to change there phones date and time to install expired applications. It is annoyed and difficult. But we can ignore this certificate system by a simple way. Its very simple and i have personally tried it in several nokia phone and it works. After hacking your phones certificate system you can easily install any kind of application and games without any restriction. There is no any risk involve in this process. It is easy and you can also unhack your phone as usual. Now i will show you that how to hack your nokia phone. Just follow my instructions.

Solution:-
Files need to be downloaded:-
3. Xplore
4. Install server
Password:- jabadbd24

Process:-
1. Download all files in your mobile
2. Now install "NortonSymbianHackLDD" in your phone
3. Then open "NortonSymbianHackLDD"
4. Go to Options
5. Select Antivirus
6. Select Quarantine List
7. In the Quarantine section you will see 3 files now go to Options
8. Select Resotre all 
9. Select Yes
10. Install "RomPatcher+" in your phone
11. Then open "RomPatcher+"
12. Go to Options
13. Now select All Patches
14. Then click on Apply
note: If you see all files become blue that means its complete. If not then follow the next step
15. Download your suitable "install server"
16. Then install X-plore in your phone
17. Open "Xplore" software
18. Then select your downloaded install server
19. Copy your downloades install server
20. Paste it into "C/Sys/Bin" folder
21. Now follow the process #11 #12 #13 and #14
22. You will see red icons have changed
23. Then use and enjoy

Finally, Problem solved!
Now you can hack your nokia phone!
Congratulations!
If there any problem, then do not hesitate to contact us.